EBB Series
Compile Firmware
1.After connecting to the Raspberry Pi via ssh, type the below sentences at the command line:
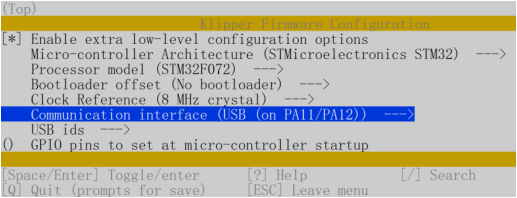
Compile the firmware with the following configuration (if the following options are not available, please update the Klipper firmware source to the latest version).
NOTE: EBB36/EBB42 VersionV1.0
[*] Enable extra low-level configuration options
Micro-controller Architecture (STMicroelectronics STM32) --->
Processor model (STM32F072) --->
Bootloader offset (No bootloader) --->
Clock Reference (8 MHz crystal) --->
If using USB communication over Type-C
Communication interface (USB (on PA11/PA12)) --->
If using CANBus communication
Communication interface (CAN bus (on PB8/PB9)) --->
(250000) CAN bus speed
NOTE: NOTE: EBB36/EBB42 VersionV1.1
[*] Enable extra low-level configuration options
Micro-controller Architecture (STMicroelectronics STM32) --->
Processor model (STM32G0B1) --->
Bootloader offset (No bootloader) --->
Clock Reference (8 MHz crystal) --->
If using USB communication over Type-C
Communication interface (USB (on PA11/PA12)) --->
If using CANBus communication
Communication interface (CAN bus (on PB0/PB1)) --->
(250000) CAN bus speed

***Note: Only after https://github.com/Klipper3d/klipper/pull/5488 is merged into the main branch of Klipper, will the official firmware support the CAN bus function of STM32G0B1. If you use CANBus communication, you can use the firmware_canbus.bin compiled by us on our GitHub, or use our source code to compile it yourself: https://github.com/bigtreetech/klipper/tree/stm32g0b1-canbus***
2.When the configuration is completed, type 'q' to exit the configuration interface. Select "Yes" when asked whether to save the configuration
3.Enter make to compile the firmware. The 'klipper.bin' firmware that we need will be generated on the home/pi/klipper/out folder of the Raspberry Pi when completed. The firmware is on the left side of SSH software, users can download it directly to the computer.

Update Firmware
NOTE: EBB36/EBB42 VersionV1.0
Update firmware via Raspberry Pi (You can also update via STM32CubeProgrammer software after the board is plugged into the computer and entering DFU mode).
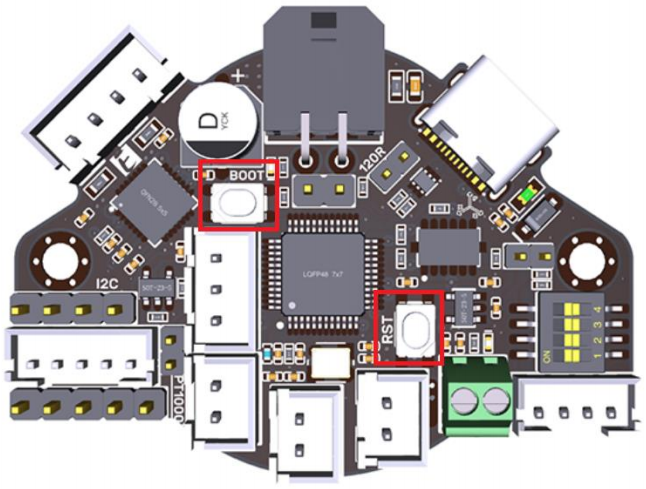
1.Press on the Boot button, then click on the Reset button to enter DFU mode.
Verison:EBB36 V1.0

Verison:EBB42 V1.0

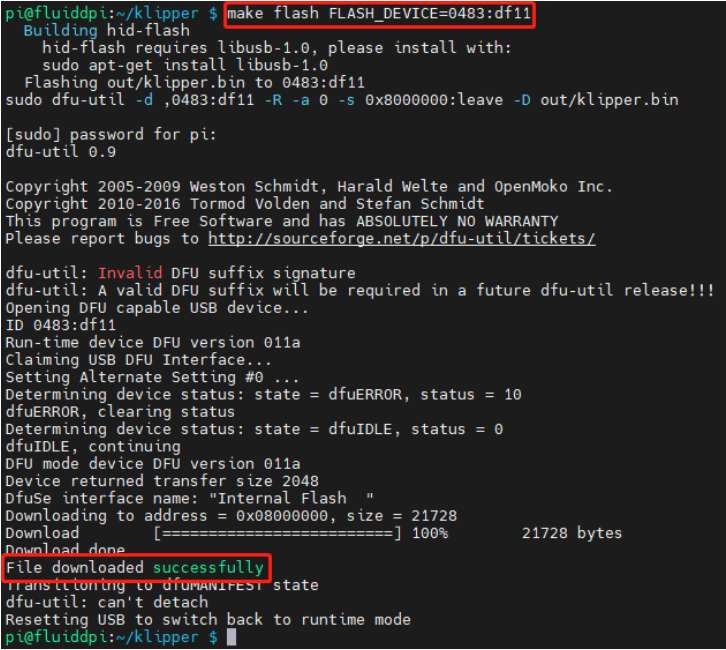
2.Type lsusb in the ssh terminal command line to query the ID of the DFU device.

3.Type make flash FLASH_DEVICE=0483:df11 to download the firmware (Notice: Replace 0483:df11 with the actual ID of the DFU device queried in the previous step).
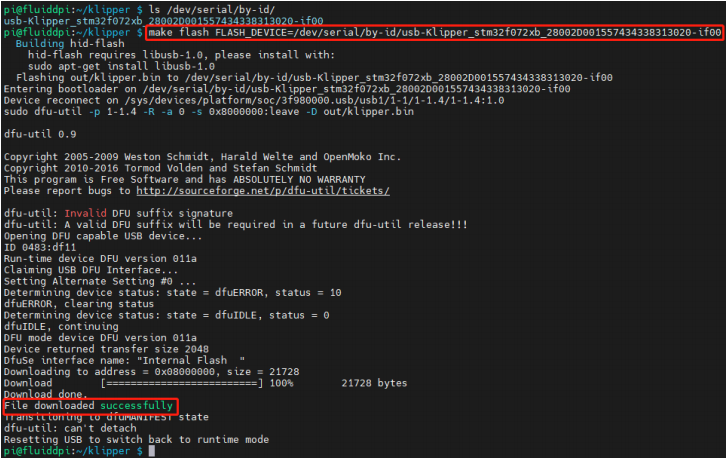
4.Type ls /dev/serial/by-id/ to query about the serial ID of the device when finished downloading the firmware (The serial ID will only exist when communicating via USB. Ignore this step when communicating via CAN Bus).

5.After downloading the firmware for the first time, there's no need to press on Boot and Reset button again to enter DFU mode when updating the firmware again. User can type
make flash FLASH_DEVICE= /dev/serial/by-id/usb-Klipper_stm32f072xb_28002D001557434338313020-if00
to download the firmware(Notice: Replace /dev/serial/by-id/xxx with actual ID queried in the previous step)
NOTE: EBB36/EBB42 VersionV1.1
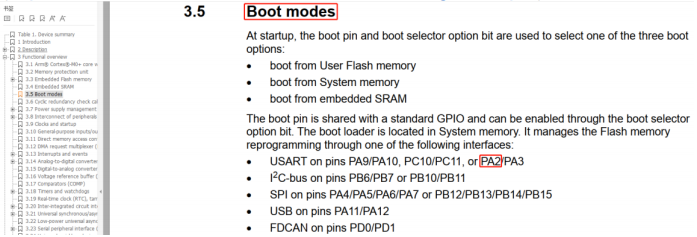
Warning:STM32G0B1CB needs to jump to the System memory area to runbootloader (written by STMicroelectronics) when using DFU to update firmware through the Type-C port. Referring to the description in manual AN2606
(https://www.st.com/content/ccc/resource/technical/document/application_note/b9/9b/16/3a/12/1e/40/0c/CD00167594.pdf/files/CD00167594.pdf/jcr:content/translations/en.CD00167594.pdf), The initialization process of this bootloader is shown in the following figure:

The IO of USART will be configured before going to the USB DFU mode.
After going to DFU mode, PA2 will be configured to output high level by bootloader in System memory area refer to the datasheet of STM32G0B1CB
(https://www.st.com/resource/en/datasheet/stm32g0b1cb.pdf)
PA2 is used for the hotend MOSFET in EBB36 CAN V1.1 and EBB42 CAN V1.1,The high level in the DFU mode change the hotend into heating state. Therefore, please pay attention to disconnect the main power VIN of the hotend when using the DFU of Type-C port to update the firmware, or ensure that the firmware update is completed soon and goto the normal working mode. Never keep MCU in DFU mode for a long time when the main power supply and hotend are connected.
Upgrade with STM32CubeProgrammer
1.Open the installed STM32CubeProgrammer and select the firmware to download (klipper.bin).

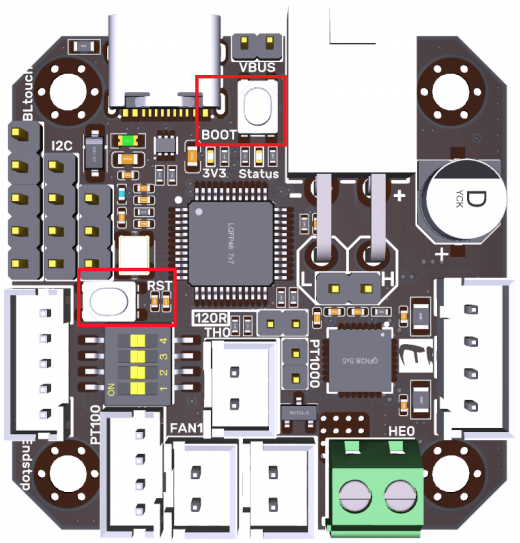
2.Press and hold the Boot button, then click the RST button to enter DFU mode.
Verison:EBB36 V1.1
Verison:EBB42 V1.1
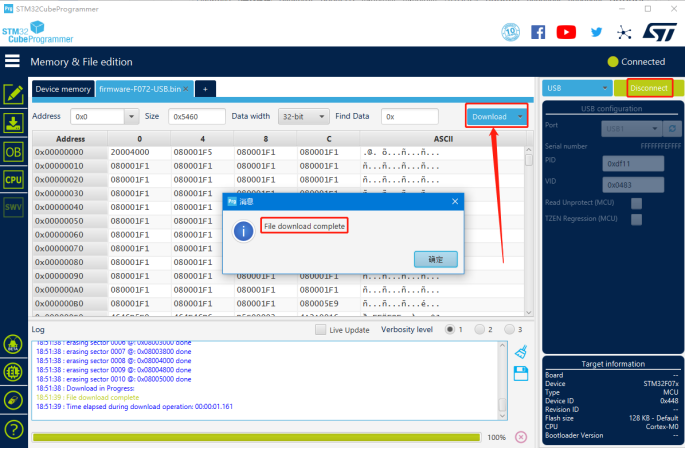
3.Click the "Refresh" button in the STM32CubeProgrammer until the Port changes from "No DFU d..." to "USB1", then click "Connect" to connect the chip.

4.After the connection is successful, "Connect" will change into "Disconnect", and then click "Download", after the download is completed, a pop-up window of "File download complete" will appear, indicating that the burning is successful.
CANBus Configuration
Use with BIGTREETECH U2C Module

1.Type the following command sudo nano /etc/network/interfaces.d/can0 in the ssh terminal and execute
auto can0
iface can0 can static
bitrate 250000
up ifconfig $IFACE txqueuelen 1024
Set the speed for CANBus at 250K (which must be the same as the speed set in the firmware (250000) CAN bus speed), Save (Ctrl + S) after modification
and exit (Ctrl + X). Type command sudo reboot to reboot Raspberry Pi.
2.Every device on CANBus will generate a canbus_uuid based on MCU's ID. If users want to find the ID for every microcontroller, please make sure the hardware is powered on and wired correctly, then run the following command:
~/klippy-env/bin/python ~/klipper/scripts/canbus_query.py can0
3.If detected an uninitialized CAN device, the above command will report the device's canbus_uuid:
Found canbus_uuid=0e0d81e4210c
4.If Klipper operates normally and is connected to the device, then it won’t report canbus_uuid, which is also normal.
Use with BIGTREETECH RPI-CAN HAT Module

1.Type and run the following command sudo nano /boot/config.txt, and added below contents on file config.txt.
dtparam=spi=on
dtoverlay=mcp2515-
can0,oscillator=12000000,interrupt=25,spimaxfrequency=1000000
After modification, save (Ctrl + S)and exist(Ctrl + X), type sudo reboot to reboot Raspberry Pi.
2.Type and run commands dmesg | grep -i '\(can\|spi\)' to test if RPI-CAN HAT module is normally connected. The normal response should be as below:
[ 8.680446] CAN device driver interface
[ 8.697558] mcp251x spi0.0 can0: MCP2515 successfully initialized.
[ 9.482332] IPv6: ADDRCONF(NETDEV_CHANGE): can0: link becomes ready

3.Type sudo nano /etc/network/interfaces.d/can0 on the ssh terminal and runthe command.
auto can0
iface can0 can static
bitrate 250000
up ifconfig $IFACE txqueuelen 1024
Set the speed for CANBus at 250K(which must be the same as the speed set in the firmware (250000) CAN bus speed). Save (Ctrl + S) after modification and exit (Ctrl + X).Type command sudo reboot to reboot Raspberry Pi.
4.Every device on CANBus will generate a canbus_uuid base on MCU's ID. If users want to find ID for every microcontroller, please make sure the hardware is powered on and wired correctly, then run the following command:
5.If detected an uninitialized CAN device, the above command will report the device's canbus_uuid:
Found canbus_uuid=0e0d81e4210c
6.If Klipper operates well and is connected to the device, then it won't report the canbus_uuid, which is normal.
Klipper Configuration
1.Enter the IP access of Raspberry Pi in the browser of the computer, and download the reference configuration of the motherboard from the file path shown in the figure below. If you cannot find this file, please update the Klipper firmware source code to the latest version, or download it from GitHub: https://github.com/bigtreetech/EBB
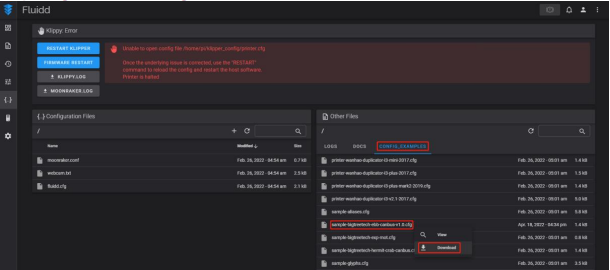
2.Upload the motherboard's configuration files to the Configuration Files.
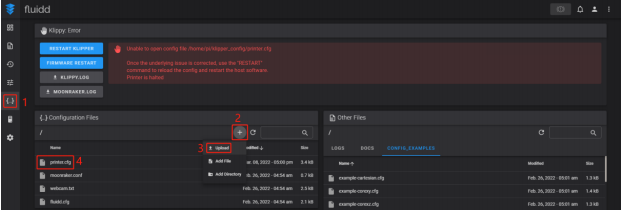
3.Add the motherboard's configuration to the file "printer.cfg".
[include sample-bigtreetech-ebb-canbus-v1.1.cfg]

4.Revise the ID number of the configuration files as the actual ID of the motherboard (USB serial or CANBus).

5.Configure the specific functions of the module as instructed below: https://www.klipper3d.org/Overview.html
PRECAUTIONS
- When the TH0 interface doesn't work with PT1000, you can't plug a jump cap on it, otherwise 100K NTC won't work.
- When using CAN communication, you need to see whether it is used as a terminal. If it is, you must plug a jumper cap on the 120R position.
- When DIY crimping, wire according to the silkscreen, and DIY according to the Pin and Schematic diagrams so as to avoid the power line from being reversely connected or connected to the CAN signal, which will get the module burned.
- If there's no external power supply during programming via USB port, you need to short the VUSB by jumper cap so as to supply the module with working voltage.
- The load current of the heater cartridge and the fan interfaces shall not exceed the maximum withstand current to prevent the MOS tube from being burned out.
- Please pay attention to the precautions in 4.2 Firmware Update to avoid keeping MCU in DFU mode for a long time when the main power supply and hotend are connected.
FAQ
Q: What's the maximum current for the heater cartridge and fan interface?
A: The maximum output current of the heater cartridge interface: 5A.
The maximum output current of the fan interface: 1A.
The total current for the heater cartridge, driver and fan needs to be less than 9A.
Q: Cannot update firmware via USB port?
A: You need to make sure that the jump cap is plugged on VUSB, and the indicator light on the board is on.