Panda Revo X1 Hotend
Product Link: https://biqu.equipment/products/biqu-panda-hotend
Product Profile
The Panda Revo, co-developed with E3D, features tool-free, 30-second nozzle changes and a Revo™ HF nozzle for blazing flow rates up to 40mm³/s, along with a powerful 60W HeaterCore. Perfectly compatible with Bambu Lab's X1 printers. Elevate your printing experience!
Features Highlights
- Co-developed with E3D, integrated E3D RapidChange Revo™ Ecosystem, compatible with all Revo™ nozzles except the Revo™ Belt Nozzle.
- 60W HeaterCore with NTC100k thermistor, custom-made by E3D, to satisfy the power requirement for high-speed high-flow printing.
- Comes with a 0.4mm Revo™ High Flow nozzle, ultra high flow.
- 30s rapid nozzle change with bare hands.
- Replaceable nozzle, no need to replace the entire hotend.
- Compatible with X1 series printer from Bambu Lab.
Specifications
| Length | 47.3mm |
|---|---|
| Package Dimension | 95x66x28mm |
| Maximum Temperature | 300℃ |
| Maximum Flow Rate | 40mm³/s |
| Nozzle Material | Brass |
| Nozzle Diameter | 0.4mm |
| Nozzle Model | E3D Revo™ High Flow |
| Heater Voltage | 24V |
| Heater Power | 60W |
| Thermistor | NTC100k |
| Compatibility | Bambu Lab X1C |
| Packing List | Qty |
|---|---|
| Heatsink | 1 |
| HeaterCore Assembly For X1(With Spring and Sock) | 1 |
| 0.4mm Revo™ High Flow Nozzle | 1 |
| BIQU X E3D Sticker | 1 |
Installation Guide
Installation Video Tutorial For X1
https://www.youtube.com/watch?v=ubwh3KBd5eE
Complete Hotend Assembly
(Cooling fan not included) for X1 Series Printer.

The image displays the "Complete Hotend Assembly" for the X1 Series Printer, with the cooling fan excluded for reference in subsequent assembly.
Safety Warning
IMPORTANT!
Before performing any maintenance on the printer or its electronics, always power off and disconnect the printer to prevent short circuits and potential damage. This is especially important when disassembling parts like the hotend, as exposed wires and components can cause electrical damage if the printer is on. For any concerns or questions, contact our support team for assistance.
Tools and Parts Needed
- H2.0 Hex Key
- Stock Hotend Cooling Fan
- Stock Mounting Screws(for heatsink and cooling fan)
Preparation
Cut the filament manually with the cutter lever and ensure the nozzle temperature has cooled to below 50℃ and the power to the printer is turned off.
Disassembly
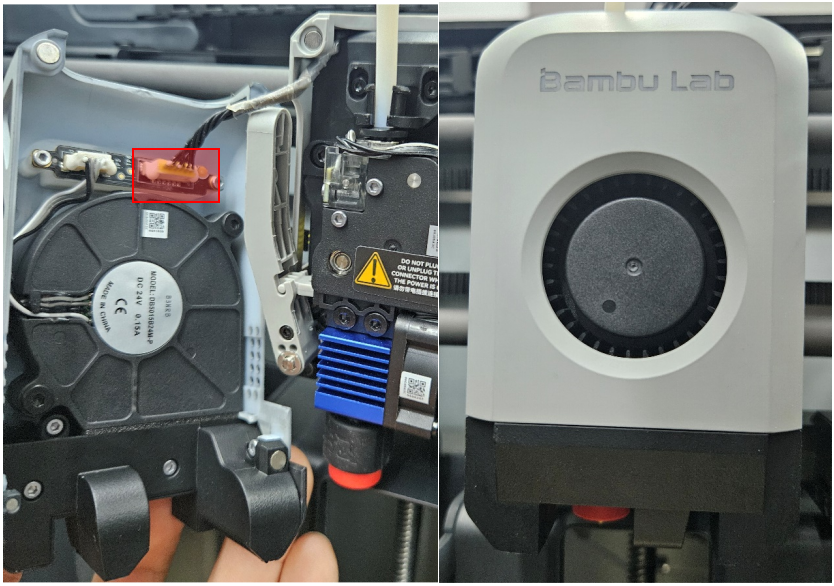
Step 1 - Remove the Front Housing
Remove the front housing assembly completely by disconnecting the fan connector.

Step 2 - Disconnect Cables
Note: Before attempting to disconnect the thermistor connector on the X1/X1C, please ensure that you press the buckle/latch to open it. The thermistor plug is equipped with a buckle/latch, which is different from the fan and heater connectors. Neglecting to open the buckle/latch before disconnecting the thermistor connector could result in damage to the thermistor plug and/or the PCB connector.
Disconnect the hotend fan and the heater connectors from the board, and remove the wires by sliding them out of the clip shown in the image below (indicated by a red arrow).

Step 3 - Remove Hotend Assembly
Remove the 2 screws with the H2.0 hex key, then proceed to remove the hotend assembly by gently pulling downwards.

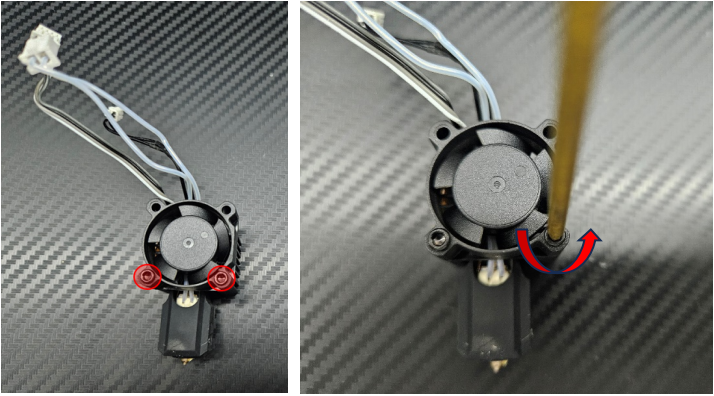
Step 4 – Transfer the Heatsink Fan
Loosen the two screws holding the fan to remove the heatsink fan.
And install it onto your brand new Panda Revo.
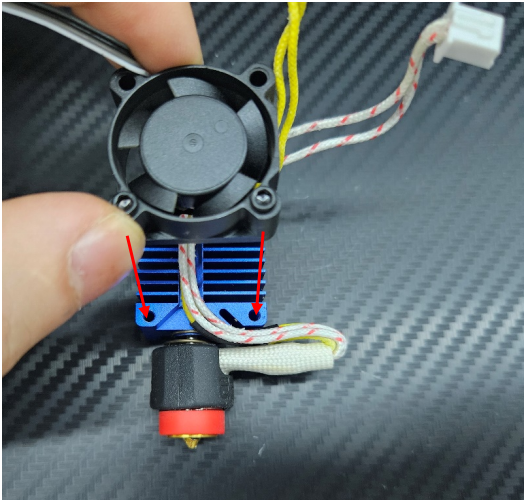
Make sure you position the cable in the cable guide channel according to the picture with the flat face of the HeaterCore socks parallel to the side of the heatsink.

The images below show the "Complete Hotend Assembly" for your reference.


Assembly
Step 1 - Install the Panda Revo Hotend Assembly
Insert the Panda Revo hotend assembly into the extruder and tighten the 2 screws.

Make sure to securely tighten the hotend screws using an H2.0 hex key, and avoid over-tightening.
Step 2 - Connect the Hotend Cables
Tuck in the heater cable wires back into the clip Connect the very small 2-pin thermistor plug, the 4-pin hotend cooling fan plug, and finally, the larger 2-pin ceramic heater plug. Tuck the wires back into the clip.


Step 3 - Install the Front Housing
Connect the housing assembly by reconnecting the fan connector onto the front housing, then close the front housing assembly cover.
How to Verify
Power on the printer and run the device’s Calibration process. If the process passes, it means the operation has been successful.

Slicer Settings
Click the "Edit Icon" and enter your filament settings.

Change the "Max volumetric speed" under "Filament" to around 35-40, depending on the filament you are using. If you observe signs of under-extrusion, lower this number until print quality is restored.

Product Purchase Link
Purchase Link:
https://biqu.equipment/products/biqu-panda-hotend
If you have any issues with the product, please submit a support ticket.
https://biqu3d.com/pages/submit-a-ticket
Navigation:
BIQU Official Website: http://biqu3d.com
BIGTREETECH Official Website: http://bigtree-tech.com
Online Store: https://biqu.equipment
BIGTREETECH Official Group: https://www.facebook.com/groups/bigtreetech
Discord: https://discord.gg/hhZsV7zk